I was going to post the Senegalese recipe that I promised you last week, but I'm afraid there's something we have to address first.
You see, one of my favorite things about Burning Pasta is the feedback that I receive from readers. Whether in the form of post comments, e-mails, Facebook notes, or in-person conversation, it’s always gratifying to know that people are not only reading, but also enjoying the content here on a regular basis.
Unfortunately, all too often, I hear a common refrain in these communiqués, which, if I might paraphrase it, goes something like this: “I love reading the blog and looking at the pictures, but a lot of the recipes seem beyond my skill level.” While I’d heartily disagree – neither myself nor the Pasta Burner have any formal cookery training whatsoever – I can understand and sympathize with such concerns.
However, the truth of the matter is that such worries are baseless -- chefs obfuscate, cookbooks lie, and, as a result, there are certain ingredients and preparation techniques that we’ve been brainwashed about; we become convinced they are just shy of impossible to pull off. Among these, I would argue that no area of the kitchen is more clogged with cloak and dagger intrigue than the domain of the pâtissier, no food more fetishized in this manner than French pastry.
I’m here to tell you that many of those breathless demands about French baking that you’ve heard – your butter has to be at an exact temperature; you have to use ten different kinds of flour for ten different kinds of bread; you have to rise your yeast breads in a towel; you need to follow every inch of traditional technique or else all is lost and you’ve disgraced Belle France herself – it’s all just meant to scare you, to keep you from trying, to make sure you spend your days reading food blogs instead of cooking from them.
Well, no more, I say! This week’s recipe is as classic and delicious as French pastry gets, except for one thing – we’re tossing out all the technique. Let’s get to it.
------------------------
French Fruit Tart with Vanilla Crème
Serves 8
Crust
1 1/2 Cups All-Purpose Flour
2 heaping Tablespoons Sugar
8 Tablespoons (one stick) Sweet Cream Butter
1 Tablespoon Vanilla
1/8-1/4 Cup Water
Chocolate Layer
8 Ounces Bittersweet (or other Dark) Chocolate
Crème
7 large or 6 extra-large egg yolks
2/3 Cup White Sugar
1 and 1/2 Cups Heavy Cream
1/2 Tablespoon Sweet Cream Butter
1 Tablespoon Vanilla
1 teaspoon Bourbon (or Dark Rum)
Fruit Topping
Assorted Sliced Fruit of your choosing, enough to cover the surface of the tart
1 Tablespoon light-colored Jelly or Marmalade
------------------------
Start by tossing the flour, the two heaping tablespoons of sugar, and the stick of butter (cut into little chunks) into your food processor. Sift the flour? Make sure your butter is ice-cold? Nah. Forget about it – there’s no need. Pulse until well mixed.
Next, get a one-eighth of a cup of tap water (again, the temperature is irrelevant), and, turning the processor on full blast, s-l-o-w-l-y add it in through the feed tube until the dough just starts to gather into a ball.

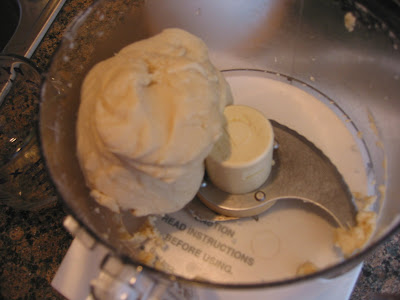
Add in a tablespoon of the vanilla, and pulse until it’s mixed in. If the dough doesn’t gather, add more water, again, very slowly, and just until you have a somewhat sticky ball of dough, as pictured below.

Now, most pastry chefs will tell you that you need to refrigerate your dough at this point, later carefully – yet quickly – rolling it out into a tart shape before the frozen butter (which, of course, is perfectly distributed throughout the dough) melts.
Pish-posh! Poppycock! Take your warm, goopy ball of dough and, tearing it into chunks, smush it into a greased tart or pie pan (you can grease it by rubbing it with the inside of the butter wrapper, but a piece of butter or cooking spray is best). You want to get it nice and thin, but if that doesn't happen for you, don’t sweat it – do what you can.

Once you’ve coated the bottom (and sides) of the pan with dough, it’ll be time to bake things off. Save a little chunk off to the side for “repairs” later, just in case you need it. I’ll explain in a little bit
Take a piece of aluminum foil that is just larger than the pan and grease it well. Push it down unto the surface of the dough, and fill the cavity with dried beans, rice, or some other disposable dry good that will weigh it down. Crank the oven up to 425 F (no need for preheating), and pop everything in there for 20 minutes.

Meanwhile, we can start working on the crème for the tart. Give the food processor a quick rinse. Toss your egg yolks and sugar into it, and turn it on full blast, whipping everything until it’s light yellow and thick.
Now, most recipes will tell you that you have to use odd proportions of milk to cream for the next step, and that everything you use must be scalded first. Forget about it. Add in one-and-a half cups of heavy cream, straight from the carton, and whip everything for 10 seconds more.

Transfer the raw crème mixture to a sauce pan, and, over low heat, stir until thickened, constantly scraping the bottom of the pan with a spatula or whisk. Don’t be afraid to pull it off the heat during the thickening process if it starts to bubble or stick to the bottom of the pan; you don't want to end up with sugary scrambled eggs. Once things get thick, whisk in the half-tablespoon of butter, the Tablespoon of vanilla, and the teaspoon of bourbon. Don’t add more than that – if the crème gets too thin, your tart will be a gooey mess.

Pour the crème through a strainer to get rid of any lumps...

...and cover it with plastic wrap (placing it on the surface of the crème), refrigerating until cold.

By now, 20 minutes should have passed. Remove the tart from the oven, lifting out the foil and tossing it away. Inspect the surface of the tart – are there any holes or cracks? If so, patch it with the extra dough you saved. You did save that ball of dough, right?

Even if there aren’t any cosmetic problems, place the entire thing back into the oven for an additional 10 minutes, or until the shell turns golden brown.

Once the shell is well toasted, remove it from the oven to rest. Meanwhile, melt down your chocolate -- because it doesn't risk scorching it, I like to do this in a bowl, in the microwave. Start with 50% power for a minute-and-a-half, stirring afterwards, and cooking for additional time until the chocolate is melted and smooth. If you don't want to use a microwave, put the bowl of chocolate over a pot of hot water (sort of like a double-boiler) to get the same result.
Pour the liquid chocolate into the base of the tart shell (even if the shell is still warm itself), smoothing it out into a flat layer. Transfer the whole thing into the fridge until the shell is cool and the chocolate is once again solid.

From here, it's simply a matter of assembly; in fact, all of the above steps can be done the day before, if you desire.
Pour the crème into the shell (on top of the chocolate), and smooth it out until flat. Slice up your fruit (no need to peel it) and arrange it in an artful pattern across the top.

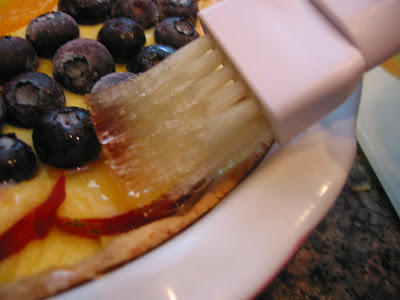
Next, to give it that classic "tart shine," take a heaping tablespoon of light colored jelly or marmalade and a splash of water and place them in a bowl. Microwave it until dissolved, and, using a brush, glaze the top with the mixture, being sure to cover the fruit, custard surface, and crust.

That's it! The final product:


Making that is that easy.
And take another look at those ingredients: Butter, flour, sugar, eggs, vanilla, a bar of chocolate that's languishing in the back of your pantry, a bowl of fruit whiling its days away on your kitchen table -- I'm willing to bet you have everything you need to make this tart, right here, right now, in your house. And if you don't, there's a good chance that you're pretty close. Like many of the recipes featured here, there's room for adjustment as well; if you don't have heavy cream, try milk; if you don't like chocolate, sub in a layer of caramel or nuts. You don't even need fresh fruit -- the tart you see up there has formerly frozen blueberries on it.
The point is this -- try. What's the worst that could happen? You're out five dollars in ingredients and your ego is left a little bruised? I think you can deal with that. Best of all, more likely than not, you'll have a delicious, cool, creamy, fresh, juicy, chocolatey, pastry-ensconced dessert to serve to your guests, the kind of thing that they'll think you searched across the city to find, the kind of tart that will make them beg you for the name of the pâtisserie. Little will they know.
Next week, the slightly-delayed Senegalese recipe. Did someone say poulet?
Music: Danny Diaz & The Checkmates -- "It's So Easy"


Looks gorgeous. Great direcitons too! Je peux manger chez vous?
ReplyDeleteCan't wait to give it a try! One note on another pastry chef silliness - pastry weights? Don't make me laugh...I've been making quiches and other puff-pastry/savory pastry dishes lately and instead of the pastry weights, use dried beans. They'll get the job done.
ReplyDeleteWanted to share a few DC links with you re: baking
http://dcist.com/2009/05/chewing_the_fat_the_covert_baker.php
http://dcist.com/2009/06/croissants_get_the_butter.php
Bon appetit!
Hmm... This looks a whole lot like a kitchen I once had.... The HAZ
ReplyDeletePS: Call me, I'd love to catch up.